Navigation: CAD Basics > Tools > Blocks, Inserts and Attributes >
Attribute Definitions (Creating Block with Attributes)


|
Navigation: CAD Basics > Tools > Blocks, Inserts and Attributes > Attribute Definitions (Creating Block with Attributes) |
|
|
Attribute Definition ![]()
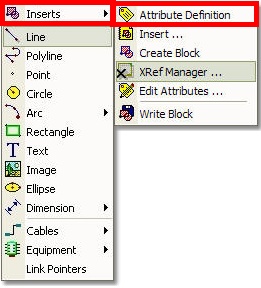
Menu: Tools>Inserts>Attribute Definition
Default keyboard shortcut: None.
Attribute Definition Properties
Property |
Style/Value Range |
Description |
Height |
Direct Entry / Double |
Sets the text height. |
Horizontal Justify |
Dropdown / Enum |
Sets the horizontal justification |
Insertion Point |
Direct Entry / Coord |
Sets the insertion point for the text. |
Rotation |
Direct Entry / Degrees |
Sets the rotation in degrees for the text. |
Tag String |
String Value |
Sets the Tag string value. |
Value String |
String Value |
Set the default Value. |
Visible |
Boolean |
Is the attribute visible when included in a block. |
Vertical Justify |
Dropdown / Enum |
Sets the vertical justification of the attribute. |
How To: Create a New Block with Attributes
This example will build on the previous door example. In this example we will create a door block with a door number attribute.
| 1. | Draw the entities to include. |
2. Click Tools>Inserts>Attribute Definition. You will be prompted to select a basepoint.
3. You will then be prompted to enter the tag name for the new Attribute. Click <OK>.
4. You will then be prompted to enter the default Value string for the Attribute. Click <OK>.
5. You will then be prompted to enter the Attribute's visibility. Enter Y for visible and N for invisible. Click <OK>.
6. Next you will be prompted to enter the text height. Click <OK> and the attribute will be created in the drawing.
Attributes inherit all of the standard text properties including the Text Style and Justifications. See below for a complete list.
7. Select the entities and click Tools>Inserts>Create Block.
8. You will be prompted for a name for the new block. 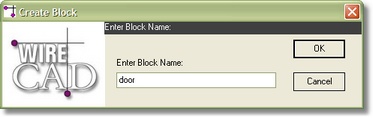
Enter the new name for the block in the Enter Block Name field. Click <OK>.
9. You will be prompted to select the Basepoint. This is the point from which you will insert this block in the future.

Please Note: At this point the block will be removed from the drawing space. It will disappear from the drawing. If you need it in the drawing you will need to insert it.
10. Insert our new block in the drawing by clicking Tools>Inserts>Inserts... Select the new block name and click <Insert>.
11. Place the new insert in the drawing.
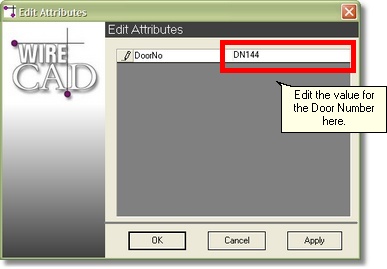
12. Edit the attribute and change the DoorNo value by clicking Tools>Inserts>Edit Attributes... You will be prompted to select an insert whereupon you will see this dialog:
13. Click <OK> to finish.